Contents
- Step 1: gather all the essential tools
- Step 2: get rid of any nail polish remaining
- Step 3: clip and file your nails
- Step 4: soak your nails (and hands)
- Step 5: prepare the cuticles by using cuticle cream
- Step 6: apply a hand moisturizer
- Step 7: prep your nails for polish
- Step 8: apply a thin base coat
- Step 9: apply atop coat
- Step 10: utilize clear nail polish to complete the look
Discover how to get strong nails so what you need to know to make manicure last longer before painting them with vibrant colors.
A neatly manicured fingernail says a lot about you. But only some have the time or resources to go to a salon every time they go out. So, knowing how to perform manicures at home will be great. A manicure is time-consuming and involves trimming your nails and applying nail paint. As you would your face, your nails require attention. You can see the nail tutorial for getting a manicure right here.
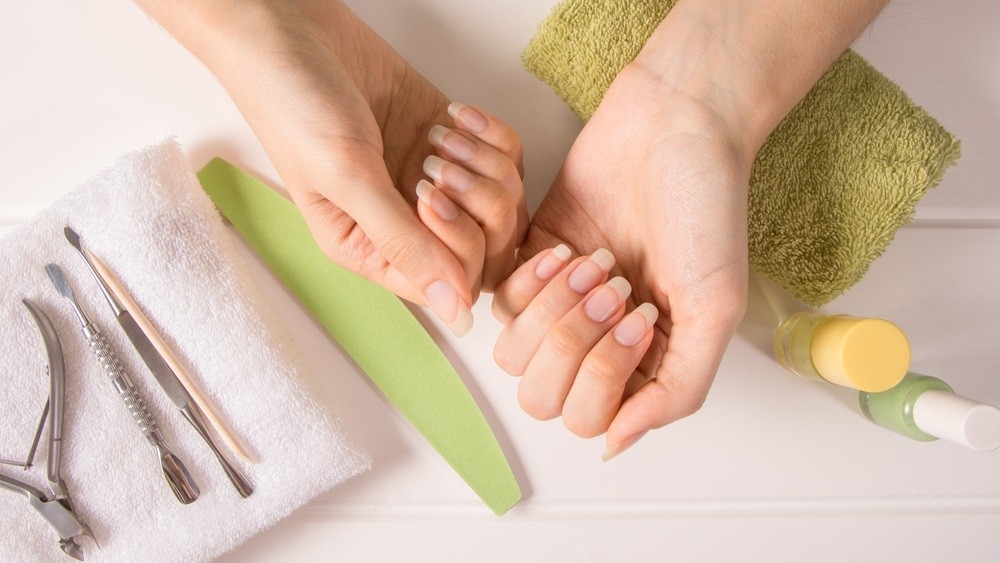
Step 1: gather all the essential tools
Gather all your manicure supplies before giving yourself the ideal manicure. The following are the items you will require:
- Remover of nail polish
- Nail trimmer
- Cotton towels
- Hammer buffer
- Nipper and pusher of cuticles
- Cuticle cream or remover
- Hand lubricant
- A nail polish base coat
- Your preferred nail color
- A topcoat in clear
Step 2: get rid of any nail polish remaining
Start by taking off any nail polish you are wearing. Use cotton pads and a non-acetone nail polish remover to remove your old nail polish gently.
Nail paint removers without acetone don’t dry up the skin surrounding your nails. Although they remove nail paint significantly more quickly, acetone-based products can harm your nails. A non-acetone nail polish remover is preferable if you use one more than once a month.
Step 3: clip and file your nails
You can trim your nails with nail clippers. Please do not make them too short. After that, shape them with the nail file. Essential rounded nails or square-shaped nails with rounded edges are preferable if you want to keep it simple.
Be cautious when filing your nails, and avoid violently moving the file back and forth. Could you not cut them too short? Just clean off the ridges and jagged edges that the nail clipper left behind. To smooth the tops of your nails, use a slightly abrasive nail buffer. The nail paint will only adhere to your nails if you buff the nails smoothly.
Step 4: soak your nails (and hands)
The process’ most tranquil section is now. Fill a large glass basin with warm water to accommodate your palms. Your hands should be submerged in it for a few minutes after adding baby shampoo or a mild cleaner (maximum 3 minutes).
Soaking the cuticles helps soften them. Dead skin cells and grime are released by it. To get rid of any dirt residue, gently scrub the area around the nails using a nail brush. Remember to scrape underneath the nails. Do not soak your hands and nails excessively because this can harm them. You can refer to russian manicure for more nail styles.
Step 5: prepare the cuticles by using cuticle cream
Wipe your hands and nails, then apply cuticle cream on them. The cuticles should then be gently pushed back with a cuticle pusher. Avoid excessive pressure, which could cause the cuticles to be too far in and harm your nails. Additionally, this will raise your risk of contracting an illness.
Wipe off the extra cream from your nails once the cuticles are translucent. Cuticle remover can be used to clean up the cuticles if you are not using a cuticle lotion.
Step 6: apply a hand moisturizer
Apply hand moisturizer to your hands and rub it in. To achieve vital moisturization, use a rich, thick cream. Pay close attention to your fingertips, especially the region under your nails. You can even give your hands a 30-second soak in warm water if you’d like before applying moisturizer. This is also an important nail care step and the reason why men should do their manicure.
Step 7: prep your nails for polish
If too much moisturizer is on your nails, nail polish won’t adhere to them. Therefore, you must wipe it away. Apply some nail paint remover to a cotton pad or Q-tip, then use it to wipe your nails.
Step 8: apply a thin base coat
Apply a base coat of clear nail paint. To make the color of your nail polish stand out, you can apply white nail polish as a foundation layer. This keeps your nails from becoming discolored (especially if you wear shades of red or blue). A base coat also extends the life of the nail polish.
Step 9: apply atop coat
Apply a light coat of your chosen nail polish after the base coat has dried. Roll the bottle of nail paint between your hands before using it. Avoid shaking it because doing so can cause air bubbles to form, making it more challenging to adhere to your nails.
Paint vertical stripes, starting at the base of your nail and working your way up to the tip. Allow the last layer to dry before adding another.
Step 10: utilize clear nail polish to complete the look
Apply one more coat of clear nail paint to complete the look after your first coating has dried. As a result, the nail polish is protected against flaking or chipping. The clear top coat will also cover any nail art you may have applied. In addition, you can learn about dip manicure.
With Maby, you can take the initiative in everything, proper nail care with Maby blog.