Contents
People are becoming more aware of the ways in which they can attain the same outcomes at home for services such as haircuts and eyebrow care that they would normally achieve in a salon. Some examples of these services include threading and waxing eyebrows.
This guidance is applicable to one’s fingernails and toenails as well; nevertheless, using gel to one’s nails has the potential to make problems a great deal more problematic.
This article provides you with the information you need to know about how to do your own gel nails at home, in addition to some recommendations for gel nail kits that you may purchase. If you read this post, you will have everything you need to know. Check out the nail tutorial with Maby Blog.
DIY Gel Nail Polish Tutorial
According to the website for Boots, in order to perform your own flawless gel manicure at home, you will need the following items: a manicure set, nail paint remover, gel base and top coat, gel cleanser, gel color polish, and either a UV or LED lamp, depending on the brand of gel polish that you purchase. In addition, you will need a gel color polish that is designed specifically for gel manicures. You will require either a UV or an LED bulb in order to cure the gel polish after you have applied it.
You need to make sure that your nails are clear of any old nail polish, that your cuticles have been loosened and clipped, and that your nails are shaped in the way that you want them to be before you begin applying the gel. In addition to this, you should make it a habit to clip your cuticles on a regular basis.
After that, wash your hands and make sure they are completely dry before moving on to the next stage, which is polishing your nails. After that, you can move on to the next step.
Following the application of a base coat, you should then proceed to apply the color paint, curing your nails under your UV or LED light in between each layer as indicated by the instructions that were included with your gel manicure kit. If your gel manicure kit did not come with instructions, you can find them online. It is recommended by the producer of your gel manicure kit that you cure your nails with the UV or LED light in your lamp.
To finish the procedure, you will need to wipe your nails clean with the gel cleanser, apply the gel top coat, and then cure your nails under the lamp one more time in accordance with the instructions that were included with your kit. Only then will the process be complete.
Gel manicure sets for use at home
Mylee Full Spectrum LED Lamp for Gel Polish Manicure Lighting System – £94.99
This one might be on the more expensive end of the spectrum, but you get a lot of bang for your money with this package, which is perfect for both home users and professionals to apply in their job regardless of the degree of experience they have.
The kit has everything that is necessary, including an LED bulb, remover, wipes for cleaning the nails, and Prep & Wipe fluid. In addition, the kit includes an LED light. A remover is also included in the kit. The kit contains each and every one of these components in their totality with no exceptions. It is offered in a total of four unique colors, each of which has the ability to function as either a top coat, a base coat, or both depending on the effect that you are going for.
DIY Gel Manicure Kit – Le Mini Macaron – £42.37
This adorable little set comes with a miniature LED lamp that, in the same manner that it can be used for your fingers, it can also be used for your toes.
One of the many benefits supplied by this set, which makes it very easy to apply, is the convenience of having a colored polish that does not require for a base or top coat. This is just one of the many benefits offered by this set.
Kit for Beginning the Red Carpet Manicure – £69.95
Because Red Carpet Manicure is such a well-known brand in the manicure industry, it should come as no surprise that this kit has everything necessary to get salon-quality results at home.
This kit comes complete with an LED light, pre and post application cleanser, PREP Max Adhesion Sanitizer, a base and top coat, gel nail polish remover, cuticle oil, gel polish in Creme de la Creme, 20 remover wraps, 20 lint-free wipes, 5 Orange Wood sticks, a cuticle and Pro Buffing Stick, two adhesive buffing tape strips, and an emery board. Try to recite that phrase five times in a row! In addition, please refer to: We Want Our Nail Salon to Recreate Celebrity Red Carpet Manicures.
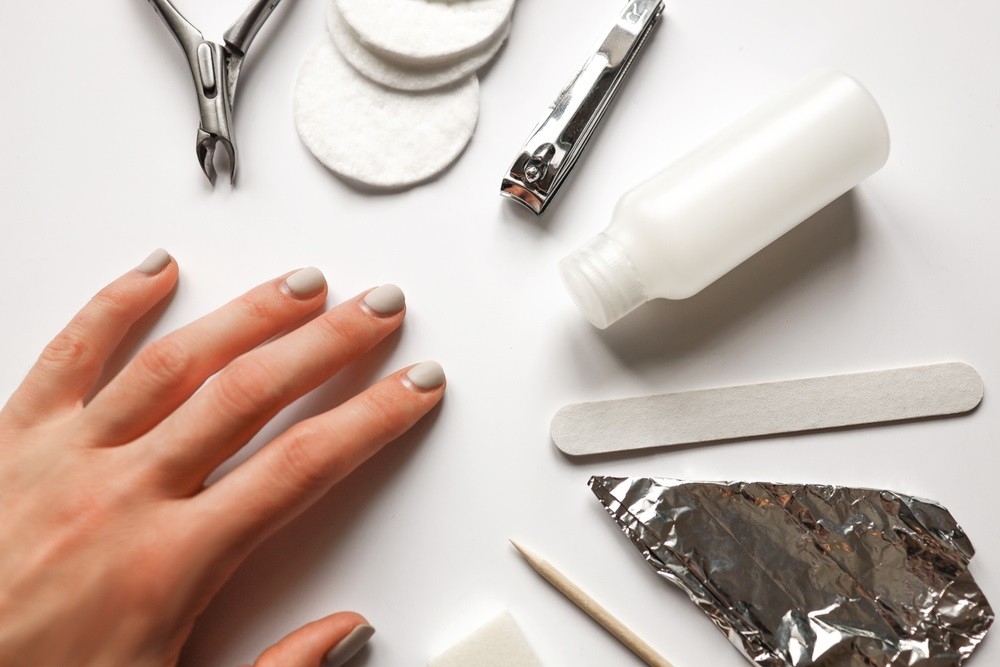
Home Remedies for Taking Off Gel Nails
Previously, we had a conversation with Michelle Humphrey, who is a celebrity nail technician. She shared with us all the details about how we may remove gel nails from the convenience of our own homes.
She gave the following advice: “If removal at home is necessary, begin by buffing the top coat off of your gels; if you don’t buff them first, you’ll find removal to be an absolute nightmare.”
Following that, you are going to require cotton wool, a nail paint remover that contains acetone, and aluminum foil.
Michele continued by saying, “Soak off using cotton wool that has been saturated in acetone and foils, gently push off any gel that has come loose using an orange wood stick, re-wrap if necessary, and make sure that the cotton continues to be saturated in remover.”
It is estimated that you will need between 30 and 45 minutes to complete this process on your own. Never try to force any product off the nail plate by using excessive force.